
Last updated: August 14, 2026
When charging stops and everything else in the coach still works, the first thing to look at is the RV converter fuse. Most converters carry a pair of automotive blade fuses on the 12 volt side, and when those two open, the unit keeps humming while nothing reaches the battery. Owners chase dead converters for a weekend and then find two fuses that cost less than a cup of coffee.
The catch is that an RV has fuses in several places, and they do not all mean the same thing. This guide sorts out which fuse belongs to the converter, which ones only look like they do, how to tell a blown one from a good one without guessing, and what a repeat failure is trying to tell you. It also names the point where the fuse is a symptom rather than the fault.
This article contains affiliate links. If you buy through them, we may earn a commission at no extra cost to you. Learn more.
Quick Answer
Which fuse does an RV converter use, and what happens when it blows?
- Most converters use two automotive blade fuses on their DC output, commonly rated somewhere in the 30 to 40 amp range, mounted on the converter itself or just above the fuse panel. They act as reverse polarity protection.
- When that pair opens, the converter still powers the 12 volt circuits through the panel in many rigs, but the battery stops charging. The classic sign is a flat battery after a night on shore power.
- Replace both fuses at the printed rating, never higher. A fuse that blows again is reporting a fault in the wiring or the battery connection, and that is where the search continues.
Which Fuse Is Which
Before pulling anything, work out which protective device you are actually looking at. An RV usually has four separate layers between the pedestal and your lights, and each one fails with a different signature.
| Device | Where you find it | What it protects | How it fails |
|---|---|---|---|
| Converter DC fuses (a pair) | On the converter deck or beside the 12V fuse panel, usually two identical blade fuses | The converter output against reverse polarity and short circuits | Charging stops, battery slowly goes flat while plugged in |
| 120V converter breaker | In the AC section of the power center, often labeled converter | The AC feed into the converter | Converter goes completely silent, no fan, no charging |
| Branch circuit blade fuses | The rows of small fuses in the 12V panel | Lights, pump, furnace, slide controller, fridge board | One system dies while everything else keeps working |
| Main battery fuse | Inline near the battery, often a large ANL, MEGA, or MIDI type | The main positive cable between battery and coach | Everything 12V dies at once, including on shore power in some rigs |
| Chassis or tow vehicle fuse | In the tow vehicle or the chassis panel of a motorhome | The charge line from the engine alternator | Battery does not charge while driving, but charges fine on shore power |
If nothing in the coach works at all, start at the main battery fuse and the battery disconnect rather than the converter. If only the charging stopped, the converter pair is the right place to begin. The wider symptom map lives in our guide to RV converter repair.
Why Converters Use Two Fuses
The pair exists because of one specific mistake: connecting the battery backward. Reverse polarity would push current straight back into the converter’s output stage and destroy it, so manufacturers put a sacrificial fuse in each leg. Hooking the battery up the wrong way opens both of them instantly, which is exactly what they are for.
That design has a side effect worth knowing. Because the fuses sit on the output rather than the input, a converter with two blown fuses still shows every sign of life. The cooling fan runs, the unit gets warm, and in many power centers the 12 volt circuits keep working because they are fed from the battery through the panel. Nothing announces the failure until the battery is empty.
Where they are physically located
On a deck style converter inside a power center, the two fuses usually sit on the face of the converter module, sometimes behind a small cover, separate from the neat rows of branch fuses. On a standalone converter mounted in a cabinet or a bay, they are commonly on the unit’s DC terminal end. Some installations move them into an inline holder on the output cable instead. The printed rating on the converter label is the one that matters, not the rating of whatever fuse happens to be in there now.
How to Tell a Blown Fuse From a Good One
Looking at a blade fuse is the least reliable test there is. The filament can crack in a way that stays visually connected, and a fuse that failed from heat rather than current can look perfectly normal through the plastic. Two methods settle it properly.
The first is continuity. Pull the fuse, set a multimeter to the continuity or resistance setting, and touch a probe to each blade. A good fuse beeps or reads near zero ohms. An open one reads nothing at all. The second method tests without removing anything: with the circuit live, put the meter on DC volts and touch the two small test points on top of the fuse. Voltage on both sides means the fuse is passing current. Voltage on one side only means it is open.
Before you probe anything, take the standard 12 volt precautions. Unplug the shore cord, open the battery disconnect, and take off rings and a watch. That is enough for fuse work, since you are staying entirely on the DC side.
A basic meter that reads DC volts and continuity covers this test, the converter output test, and the drain hunting later. It is the one tool that turns guessing into checking.

Replacing the Fuse the Right Way
Replacement is straightforward, and almost all of the mistakes happen in the details rather than the act. Work through it in this order.
- Unplug shore power and open the battery disconnect. The converter output has voltage on it whenever either source is connected.
- Read the rating printed on the converter label. Do not read the rating off the fuse that was in there, because someone may already have fitted the wrong one.
- Pull both fuses, not just the failed one. They age together and a partly damaged fuse creates heat and voltage drop long before it opens.
- Fit two new fuses of the same type and rating. Blade fuses come in mini, standard ATC or ATO, and maxi sizes, and a maxi holder will not take an ATC fuse. Match physical size as well as amperage.
- Reconnect the battery first, then shore power. Watch the new fuses for a moment. If they open the instant power arrives, stop and read the next section.
- Confirm charging returned. Measure battery voltage with shore power connected. A working converter usually lifts it into roughly the 13.2 to 14.4 volt band depending on the charge stage.
Keeping a small assortment on board is sensible, because the same fuse family protects the water pump, the lights, the slide controller, and the fridge control board. Running out of a common rating at a campground is a genuinely annoying way to lose an evening.

If the new fuses hold but the battery still does not charge, the fuse was not the fault. Work through an RV converter not charging the battery next, and confirm output with the multimeter test.
When the Fuse Blows Again
A repeat failure is information, not bad luck. The fuse is doing precisely its job, and the only wrong response is fitting a bigger one. Larger fuses do not fix faults, they move the failure point from a part designed to fail safely to wiring that is not.
Four causes account for most repeats. A reversed battery connection, which usually happens right after a battery swap and opens both fuses immediately. A chafed positive cable touching the frame somewhere along its run, often where it passes through a panel or over a sharp edge. A failing converter with an internal short, which normally arrives alongside a buzzing noise or a hot smell. And a battery so deeply discharged that it demands maximum current for hours, pushing a marginal fuse past its rating through sustained heat rather than a sudden spike.
What to check before the third fuse
Confirm polarity at the battery, red to positive and black to negative, and check that no one recently swapped a battery or a cable. Follow the converter output cable by hand along its whole length, feeling for flattened insulation or a spot where it crosses metal. Look for green crust on the terminals and the chassis ground strap, because a poor ground raises current everywhere else. And if any part of the converter smells hot or shows a scorch mark, disconnect shore power and stop, because that is a replacement rather than a repair. Our walkthrough on common RV converter problems covers each of those patterns in detail.
The Other Fuse Worth Knowing About
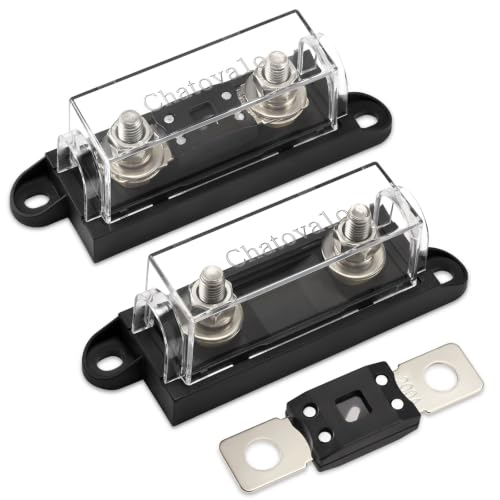
Between the house battery and the rest of the coach there is usually one large fuse, typically an ANL, MEGA, or MIDI type in an inline holder near the positive terminal. It exists to protect the heavy cable, not any single appliance, and it is commonly rated far above the converter fuses because everything in the rig passes through it.
Owners meet this fuse in two situations: after a total 12 volt blackout that no branch fuse explains, and while adding an inverter or a bigger battery bank. If yours is missing, corroded, or clearly the wrong rating for the cable, that is worth correcting before anything else, since an unfused main cable is the most dangerous shortcut in an RV electrical system.
Where This Stops Being a DIY Job
Fuse work on the 12 volt side is normal owner maintenance. Checking, pulling, and replacing DC blade fuses, cleaning battery terminals, and measuring DC voltage are all things you can do in a driveway with the shore cord unplugged and the disconnect open.
The 120 volt side is different, and the boundary is not negotiable. Opening the AC section of the distribution panel, replacing or adding breakers, and hardwiring a converter are work for a certified RV technician or a licensed electrician. So is anything involving a burning smell, melted insulation, or a scorch mark, because at that point you are no longer diagnosing a fuse. If the converter breaker keeps tripping rather than the fuses blowing, that is a separate pattern with its own causes, covered in why RV breakers trip at a campground pedestal.
Common Mistakes to Avoid
- Fitting a higher rated fuse. If the correct fuse keeps blowing, it is reporting a fault. A larger one just relocates the damage to the wiring.
- Replacing only one of the pair. The surviving fuse has taken the same heat and often fails a week later.
- Judging a fuse by looking at it. Cracked filaments are frequently invisible through the plastic. Test for continuity instead.
- Reading the rating off the old fuse. The label on the converter is the authority, because a previous owner may have guessed.
- Ignoring a slow drain instead. If the fuses are fine and the battery still empties, the problem may be something quietly consuming power. Our guide to finding a parasitic battery drain covers the hunt.
- Working with the battery connected. Open the disconnect first. It costs ten seconds and removes the only real risk in the job.
Frequently Asked Questions
What size fuse does an RV converter use? It varies by model and output rating, but a pair somewhere in the 30 to 40 amp range is common. The correct value is printed on the converter label, and that is the only figure to trust.
Will the RV still work with a blown converter fuse? Usually yes, at first. The 12 volt system keeps running from the battery, so the failure only becomes obvious once the bank runs down, often overnight.
Why do both converter fuses blow at the same time? Because they sit in a reverse polarity protection pair. A backward battery connection opens both instantly, which is the design working as intended.
Is there a reset button instead of a fuse? Most converters do not have one. What owners usually find is the 120V breaker feeding the unit and the DC fuse pair. See where the RV converter reset button is.
Can a blown fuse damage the battery? Not directly, but the resulting lack of charging can. A lead acid battery left deeply discharged for weeks often loses capacity permanently, so fix the charging before replacing the battery.
The Bottom Line
The converter carries a pair of DC blade fuses that protect it against reverse polarity, and when they open the coach keeps running while the battery quietly dies. Test them for continuity rather than trusting your eyes, replace both at the rating printed on the converter, and treat a second failure as a wiring or polarity fault rather than a reason to fit something bigger. Everything on the 120 volt side belongs to a certified RV technician.